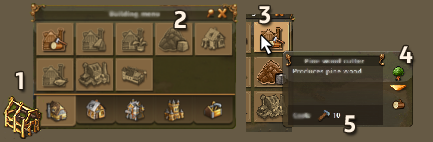
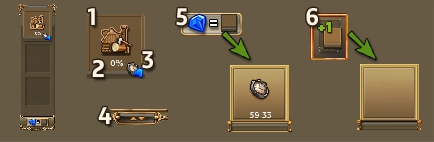
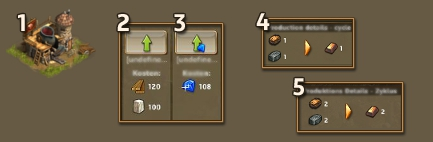
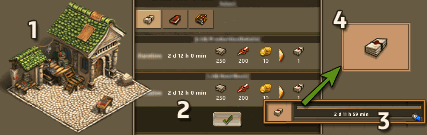
The building menu:
The building menus are available via the building buttons in the main action bar.
1. The building menu for the first city level.
2. In the menu, all buildings for this city level are displayed. If an icon is grayed out, then you do not meet the required level.
3. When you move the mouse cursor over an icon, you can see the building’s name and its description…
4. …the resources consumed and produced…
5. and the construction costs.
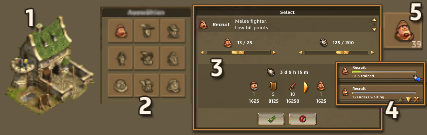
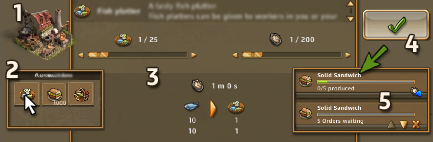
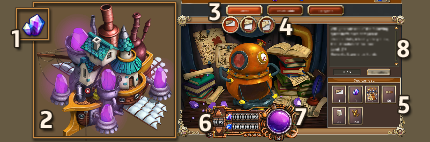
The workyard:
1. The upgrade area
2. Production area here, you’ll find the resources consumed and produced, the total production time, the pause production button, and a notification of whether a settler is working in this building
3. Building description
4. Remaining buff time
Place a building:
When you click on a building in the building menu, a green area appears. This marks the space in which this building can be placed.
1. If the building is darkened (i.e. the area is not green), it cannot be placed where it is currently situated
2. If the building is highlighted, it can be placed in its current position
3. If you want to leave the building placement mode, click the «cancel action» button
The building queue:
Your settlers can construct only one building at a time, but you can order several buildings, which will be built one by one. When a building is in the building queue, you will see the following information
1. The building’s icon
2. The completion percentage for the building
In addition, the following functions can be found in the building queue
3. Finish the building instantly
4. Scale the building queue
5. Buy a temporary slot to add to your three standard slots
6. Buy a permanent slot from the merchant in the black market category.
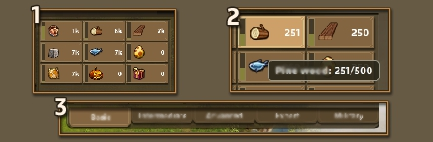
The storage:
You can find your storage details by clicking on your mayor’s house or one of your storehouses.
1. In your storage, all of your resources will be displayed. The green bar shows how much of your available storage is already being used by each resource.
2. Mouse over one of the resources to see the exact amount and total available storage.
3. In the tabs at the bottom of the window, you can switch between the resources of the different city levels.
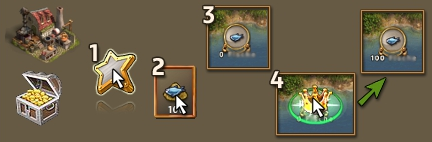
Use a buff:
1. Open the star menu
2. Click on the buff you want to use (the number on the button shows how many buffs are in the stack)
3. The cursor will change to the buff cursor (the number on the right button shows how many buffs are in the stack)
4. Click on the building you want to buff
When the buff cursor is in use, every building you can buff will be highlighted.

Use the provision house:
In the provision house, you can transform resources into buffs, deposit refills or other resources.
1. Click on the provision house
2. Select what you want to produce. At the bottom of the window, you’ll find three tabs, one for each type of item. A small number on each item indicates how many units of this item are already in production.
3. In the detailed view, you can adjust the amount of items in production, and the stack size. Beneath the sliders, you can see the costs and the time required.
4. By clicking the «Accept» button, you can confirm your order, and it will be transferred into the production queue.
5. In the production queue you can see all of your stacks, adjust the work order, cancel a single stack, or instantly finish the current item’s production. Hovering your mouse cursor over a stack will let you see the remaining production time. Next to your orders, there are further buttons
6. You can spend gems to instantly finish the current production.
7. The other buttons let you change the order of items in the queue or remove entries.Items will be produced in stacks. This means when you produce five fish plates in a single order, the whole stack has to be produced before you receive them.
Every item you produce will take up a certain amount of time. By clicking the gem icon next to the bar, you can instantly finish the item production.
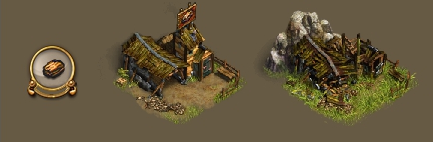
Mines:
To make use of the ore deposits your geologist finds, you need to place a mine on them. Each mine needs its own deposit. When the deposit is empty, the connected mine will collapse.
The number of deposits of any one type is limited. This means you can only have a certain number of mines.
Tip To produce more ore, you can upgrade your mines.
Tip Refilling an ore deposit before it’s empty will help you avoid having to search for a new deposit and build another mine. You can find refill items for all deposits at the merchant’s.
Use a refill item:
You can obtain refill items from both the provision house and the merchant.
1. Open the star menu
2. Click on the refill item
3. Look for a deposit you want to refill
4. Use the refill item on the deposit
Tip
Refilling an ore deposit before it is empty will help you avoid having to search for a new deposit and build another mine. You can find refill items for all deposits at the merchant.
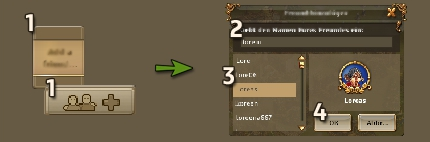
Invite a friend:
1. Click on ‘invite friend’ in the friends list, or on the left hand side of the friends list.
2. Write the name of the player you want to invite in the text field
3. Select the player in the list
4. Click the OK button to send the invitation.
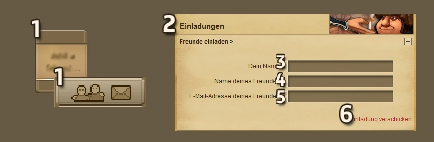
1. Click on ‘invite friend’ in the friends list, or on the left hand side of the friends list (a new browser window will open).
2. In the new window, click on ‘Invite a friend’
3. Write your name in the text field
4. Write the name of your friend in the other text field
5. Fill in your friend’s e-mail address in the final text field
6. Click on ‘Send invitation’.
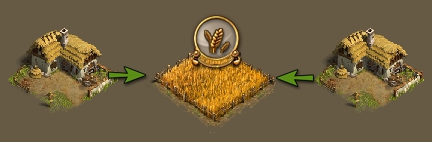
Farms and wheat fields:
Farms work in a different way than the other workyards a farm collects the grain from a wheat field. Wheat fields are also buildings which you have to place. More than one farm can collect wheat from one field. Wheat fields can also end up empty, at which point you’ll have to build a new one.
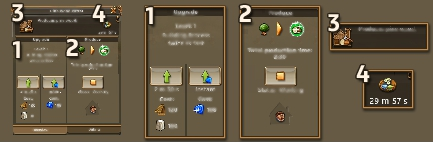
Upgrade a building:
1. Click on the building you want to upgrade
2. You can upgrade a building with normal resources, which may take minutes, hours or days depending on the upgrade level.
3. However, you can also upgrade the building instantly using gems.
4 & 5. When you upgrade a building, it will produces more but also consume more.
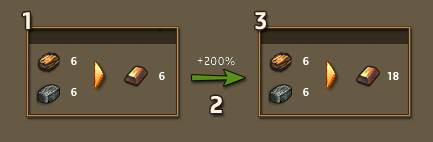
Productivity buffs:
1. Unbuffed production cycle
2. Buff effect
3. Production cycle buffedWhen a building is buffed, its production output will increase by x%. This boost is indicated by the +x% text. The increase is based on the normal output of the non-buffed production building. The boost is added on top of the initial output.
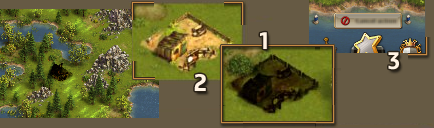
Claim a sector:
You can claim a clear sector by placing a storehouse in that sector
1. Open the first building menu
2. Click on the storehouse button
3. Place the storehouse
You can now place other buildings in this sector.
Building licenses:
In the resource bar at the top of the window you can find your remaining building licenses. You’ll need these licenses for most buildings, except for merchants, wells, wheat fields or garrisons. All others consume one license per building. When you tear down a building, you get the licenses back.
Mines are a special case. When a mine collapses you instantly get the license back, so you won’t get a license when demolishing a depleted mine.
Trade:
To unlock trade you have to reach level 12 and build the trade office, which can be found in the building menu or in the shop. You can enter the trade menu above the scales, right next to the economic overview. Here you can buy and sell whatever you like. There is also a search function, and a filter for quickly finding the goods that you are interested in. Note that trade is limited to the server. You cannot trade with players from other servers.
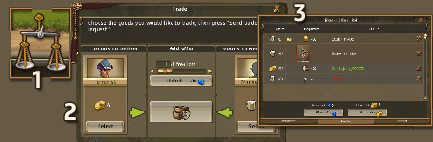
Trade offers:
1. Click the scales at the bottom of the screen to enter the trade menu. In the buy window, you can see offers from other players. On the right-hand side you can filter which offers are displayed.
2. If you want to make an offer yourself, click «Place offer» in the sell tab. Here, you choose which item you would like to sell, the quantity and price. If you want to make an offer several times, you can use multiple lots.
3. You can sell anything you want, for example an adventure, a buff, or a resource.
One offer is free. After setting your free offer, you can buy additional slots for gems or coins.
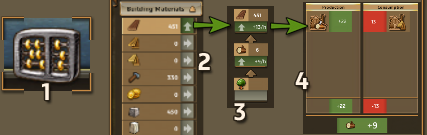
The economy overview:
The economic overview helps you visualize your economy.
1. Click on the slide rule at the bottom to open it.
2. A window appears listing all your resources.
3. Clicking on a particular resource displays a resource tree on the right, detailing all resources involved in this chain and indicating whether the current state is positive (green), neutral (gray), or negative (red).
Note if one of your resources is yellow, it means another resource in the chain is negative and needs to be checked.
4. Click on any of the resources in the chain to see all building types producing or consuming the resource in question. Clicking on the type shows a list of all the existing buildings of this type on your home zone.
Note The results you see reflect the current circumstances, including buffs that may only be temporary.
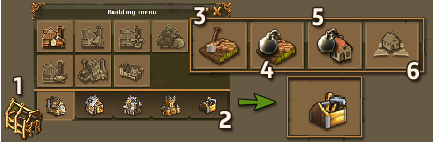
Toolbox:
1. To access the toolbox, just click on the building menu on the bottom left of the screen.
2. On the far right on the building menu you will find the toolbox. Click on the toolbox icon to open the toolbox menu.
3. Build street build streets between your buildings for no cost (decorative purpose only).
4. Demolish street tear down the streets you have built for no cost.
5. Demolish building tear down a building and get back a certain amount of the resources you used, including the resources and building license.
6. Move building move a building for a certain amount of resources or gems, depending on the building type and upgrade level.
The Bookbinder:
The book binder lets you create books.
1. Select the book binder by clicking it.
2. Select the type of book you want to produce. The costs of your chosen book, and the next book in line will be displayed. Confirm your selection by clicking the button below.
3. When you confirm the production, the button vanishes and the produced book appears.
4. Once the production is completed you can pick up the book from the book binder by clicking the button next to the book icon.
The prices for books increase the more books you produce. Simple books need to be refined in order to create more advanced books.
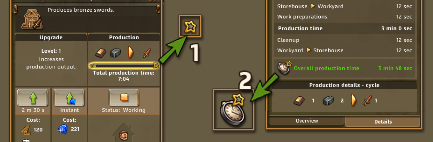
Production Weeks:
Sometimes there are events, influencing certain production chains on your island. The affected buildings can differ from event to event.
As soon as an event week starts, you’ll receive a message near your Avatar. All influenced chains will be marked in the relevant building window. There will be a star icon and a highlight surrounding the progress bar (1).
When you click on the details tab, the influenced value will be written in green, alongside the star icon (2).
When you hover over the star icon, you get a tooltip giving you additional information about the benefit this production chain gets.
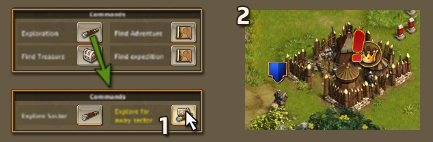
Archipelago sectors:
The sectors to the south and east of your main island can be explored and annexed in a way similar to the other sectors.
1. To start, send out your explorer by selecting the “Explore far away sector” option.
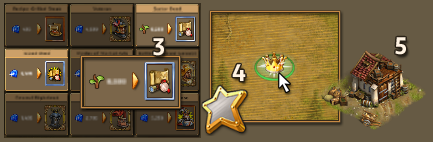
2. If the sector contains any bandit camps, you’ll first have to defeat all the leader camps. Transfer your general’s garrison to an already annexed archipelago sector to start your attacks from there.
3. Since these sectors are technically not a part of your island, you will need to purchase a deed from the «black market» category at the merchant. There are two kinds of sectors that require different deeds
a) “Sector deeds” are used to claim the majority of the sectors forming the connected archipelago.
b) “Island deeds” unlock the bandit-free islands flanking the main archipelago.4. Once purchased, select the deed from the star menu and apply it to the sector.
5. Finally, build an island storehouse to annex the sector and connect it to your main island.
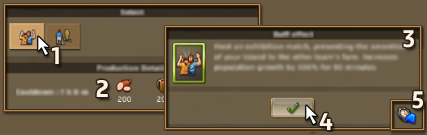
Cultural Buildings:
Cultural buildings have the ability to apply zone-wide buffs to your home island. To apply a buff, click on a cultural building to bring up the menu displayed above. Then, perform the following steps
1. Select the buff you want to apply.
2. The resource costs of the selected buff will be displayed, along with its cooldown time (see below).
3. Check the description of the selected buff.
4. Pay the costs and apply the buff by clicking the checkmark button.Using a cultural building will trigger a cooldown period. During this time, the building cannot be used again, and the checkmark button (4) will be replaced by the remaining cooldown time and a different button (5). You can click that button to skip the cooldown time, in exchange for a number of gems.
The Excelsior:
Once Captain Graham has anchored her airship, the Excelsior, on your island, you can invest crystals or gems to earn various rewards in the Forge of Truth. You either receive generic rewards like resources and buffs, or unique text segments, which you can collect to get exclusive quests and adventures.
1. Earn crystals by logging in once per day and by completing daily quests.
2. Click on the Excelsior.
3. Select the text category you want.
4. Select the specific text parts you want to try to earn.
5. The previous choices influence which rewards you may receive.
6. The costs for using the forge are displayed here. If you do not have enough crystals, you can make up for any shortfall with gems. Use the arrow buttons to increase your investment, and earn more rewards.
7. When you’re satisfied, click the big purple button to start the process!
8. When you’ve collected enough text parts, you can complete the text to receive one of these rewards.
Barracks:
In the barracks (short cut «B») you can train your military units. When you first start out, you’ll only be able to train recruits, but as you level up you’ll unlock more units.
1. Open the barracks by clicking on the building or by pressing «B».
2. Choose the unit you want to train.
3. A window will appear, which shows you the required resources. Use the sliders to define the amount of units you want to train and the number of stacks. Beneath the sliders you can see the cost of your order and the amount of time required.
4. You can train only one stack at a time. Over in the waiting loop you can check the remaining time, adjust the production order, cancel one or all queued stacks, or instantly complete the current stack in exchange for gems.
5. The numbers on the unit buttons show you how many units of that type are currently in production.
Military units do not consume settlers, but instead block them. However, when your military unit gets defeated, you’ll have to reproduce this settler again.