The General:
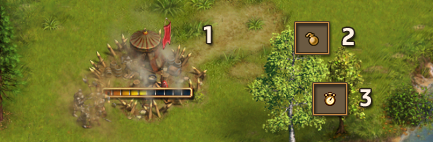
If you obtain a new general, you must first place their garrison on the map
1. Open the star menu
2. Click on the general of your choice
3. Place the garrison on your island
Initiating a battle:
1. Click on the garrison to open the garrison menu
2. Assign the units you need for the battle, and click the OK button to confirm your selection
3. Click on the attack button and …
4. …Click on the bandit camp you want to attack
5. Your general will move to the camp and start attacking it
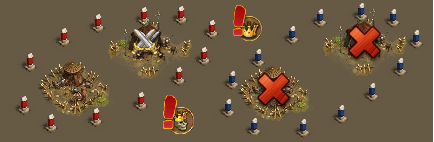
Attack areas:
All enemy camps have an attack area. If your general walks through one of these areas, they will first attack this enemy camp, followed by the camp you selected.
Leader camps:
Every enemy sector has a leader camp. Leader camps are marked with a crown.
If you destroy the leader camp, the other camps will automatically collapse. When the leader camp is defeated, the sector is free.
Note if the leader camps containing a strong unit, it is marked with a skull wearing a crown.
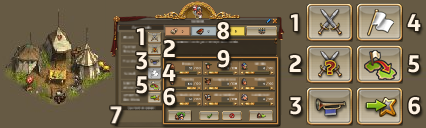
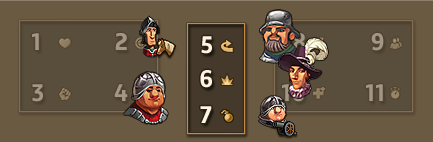
The garrison:
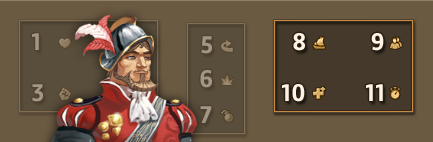
You can open the garrison menu by clicking on either the garrison itself, or its general’s portrait in your star menu. From there you can assign units to the garrison, and perform various other tasks.
1. Click on the attack button followed by an enemy camp to initiate an attack.
2. Click “Combat Preview” followed by an enemy camp to see an estimate of the outcome of the fight.
3. The “Transfer” button is used to move your garrison. Simply click it and select a new location on the current island.
4. Use the retreat button to cancel an attack and recall your general to the garrison. This can only be done before the general arrives at the enemy camp.
5. If you have an active adventure, you can click this button to send the general and all attached units from your home island to the adventure zone or vice versa. Note that this journey can take up to 30 minutes.
6. Clicking this button recalls the garrison to your star menu. The building will be removed from the island, and all assigned units will return to your reserve, ready for reassignment.
7. If your general is not idle, the task it is currently performing will be displayed here.
8. This bar shows how many different books have been invested into the general’s skill tree. The button on its right side opens the skill tree window.
9. Use these panels to assign units to the garrison. Assigned units will participate in the general’s battles and join him on adventures. Move the sliders to choose your preferred units and confirm your selection with the checkmark button, or cancel with the X button. The other two buttons switch the view between standard and elite units, and set all sliders to 0 respectively.
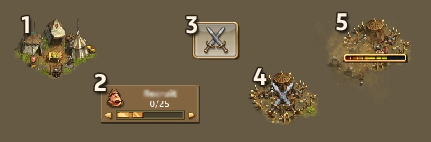
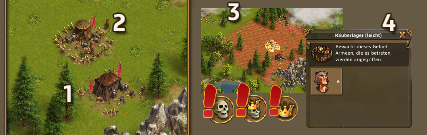
Bandit camps:
Like your general, your enemies also have a garrison, called the enemy camp. These camps are divided into two different types
1. Leader camp — the camp leading the particular sector, marked with a crown. When you defeat it, all other remaining enemy camps will be destroyed.
2. Regular enemy camp.
3. Contrary to leader camps, regular camps have an aggro range. When you enter it, your general will be intercepted, and will attack this camp instead of the one you chose to attack.
4. To get information on camps, just click on them. The camp window will show which units are there, and in what quantity. Mouse over the units to see further information about them.
Note Sometimes the camp is marked with a skull. This means that very strong units, or unit combinations, are deployed in this camp. Leader camps marked with a skull and crown contain a very strong unit.
Your general was defeated:
When your general’s army gets defeated in combat, (s)he will retreat to his/her garrison and must recover before accepting new tasks. Generals hired from the tavern need 4 hours to recover, but most others are faster. You can monitor the remaining recovery time in his/her garrison or the star menu.
To avoid being stuck waiting for recovering generals, you may acquire additional ones from the tavern or the merchant, or use medipacks, which are also sold by the merchant.
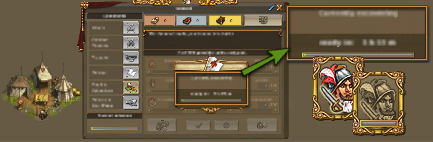
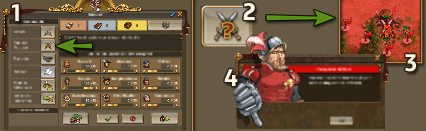
Combat preview:
The combat preview shows the player the outcome of a fight with a particular enemy camp.
1. Open the garrison with which you can attack.
2. The second button in the menu is the combat preview.
3. When you click it, you will see crossed swords with a question mark.
4. By now clicking on an enemy camp, you get a preview of what will happen when you attack with this deployment. When you attack special camps, you get a special window displaying tips on how to defeat this camp.
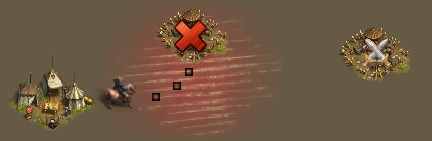
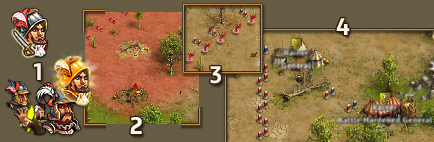
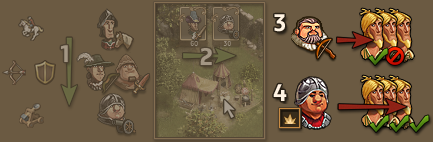
Blocking and Locking:
When you want to save resources in adventures, there are two techniques you can use, known as «locking» and «blocking».
«Blocking» involves attacking a camp in order to disable its attack area, so that another general can pass unnoticed. With this technique, you’ll lose the units of the general you’re blocking with, but you also won’t have to destroy this camp completely.
You can generally block all camps which are near other camps. (2) The timing here is important. In order to have the largest possible time frame you should use either a general with large amount of HP, or a general that fights slowly (like i.e. the tavern general). (1) With red flags showing the move path of your generals, (3) you can determine the necessary positions and attack timing of the generals. The goal is to keep your distraction general fighting the camp for as long as it takes for your main general to get by. (4) This is tricky to get right, since the slightest mismatch in timing might cause the block to fail. If your main general gets intercepted despite your efforts, don’t hesitate to order a retreat to avoid the unplanned battle, and try again later.«Locking» works similar to «blocking», however the goal is a bit different. «Locking» means to block a camp for as long as possible, so that another general can defeat the sector leaders’ camp before the battle is decided (2). When all leaders’ camps in a sector have been defeated, all ongoing battles will be cancelled and counted as a successful fight, without losses. This means when trying a locking maneuver, you should use a general who fights slowly, or a general with a large amount of units. The same caveats apply here, however should the battle at the leader camp take too long, the locking general and his units might be defeated, so you should only use this method when you’re sure you can defeat the leader’s camp in time.
Even though both of these methods have a certain risk attached to them, you’ll be able to save a lot or resources once you master them.
Note any losses you suffer using one of these methods will not be refunded!
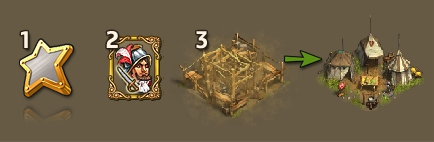
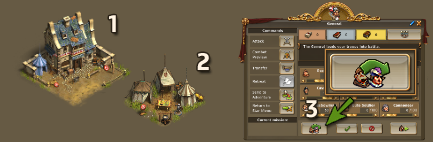
Elite units:
The Elite Barracks (1) recruit powerful units called elite units. These units are very strong but come with a downside — their specialized training renders them unable to fight in a mixed army alongside non-elite units.
Each of your generals (2) can either command a non-elite or an elite army at any given time. You can switch between the two modes by clicking the “Switch Units” button in the general’s garrison. (3)
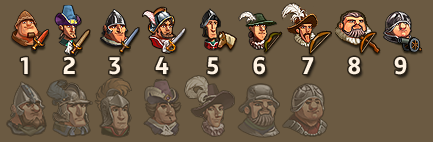
Unit attributes and abilities:
Every unit’s combat capabilities are governed by a set of attributes and abilities that can be checked in its tooltip.
Attributes are values that are shared by all combat units
1. Hit points If the unit takes this much damage in combat, it is defeated.
2. Accuracy The unit’s accuracy reflects the probability its attacks will deal the higher of its two damage values.
3. Attack damage The damage the unit’s attacks inflict is randomly selected from these two numbers.
4. Initiative Units with a faster initiative type attack before slower ones, and may defeat them before they get a chance to strike. The three initiative types are, from fast to slow First strike, normal and last strike.
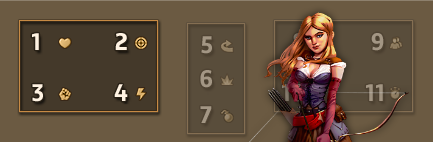
A unit may also have one or more of these special abilities that can be beneficial in or after the combat
5. Flanking The unit always attacks the enemy with the fewest hit points, disregarding normal targeting rules. Your generals cannot be flanked.
6. Splash damage After this unit defeats an enemy, excess damage carries over to one or more additional targets.
7. Demolition The unit’s attack damage is doubled when tearing down a camp after all occupants have been defeated.
Generals have a few additional attributes that apply to their whole garrison
8. Travel time This is the time it takes the general to travel to or from an adventure zone. If these times are different, they will be separated by a slash (“/”).
9. Capacity The number of units that can be assigned to the general’s garrison.
10. Recovery time The length of time for which the general will be disabled after being defeated in combat.
11. Combat time The duration of every round of a battle initiated by the general. The higher this value, the longer each fight will take.
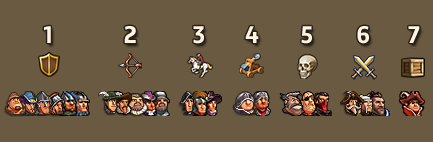
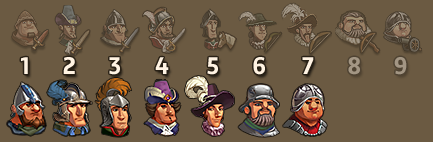
Unit types:
All units are grouped into unit types. These types give you a rough overview of the unit’s relative capabilities at a glance. You can check a unit’s type in the top-right corner of its tooltip.
1. Defense units have many hit points relative to their attack damage. More often than not, they protect other units by getting targeted by enemy attacks first.
2. Offense units have high attack damage, but few hit points.
3. Swift units have first strike, and therefore attack before most other units. As a rule of thumb, they have few hit points and deal less damage than offense units.
4. Heavy units have last strike, so they attack after most other units. To compensate, most of them have many hit points and high attack damage. To target enemy heavy units, your units will often have to defeat all other units first.
5. Bosses are fearsome enemies with attributes tens or even hundreds of times higher than those of other units. Luckily, most camps include only 1 or 2 bosses, if any. Many bosses hide behind the backlines of their army, so you will have to defeat all of their subordinates before attacking them.
6. Combat generals are your army’s leaders. Your units will protect them above all else, so they will never get attacked until your other troops have been defeated. Not even flanking enemies can get at them.
7. Quartermasters are specialized in transporting armies to adventure zones. They cannot participate in combat at all.
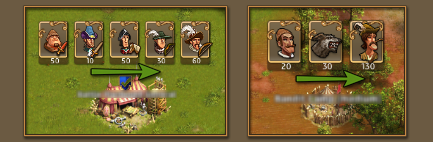
Targeting priorities:
The different units in your army, or an enemy camp, will attack in a fixed formation. This dictates the order in which they will both get targeted by, and attack their enemies.
For example, your militia will not get attacked while you still have recruits participating in the battle.The portraits shown above a garrison, or a camp, when moving the mouse cursor over it will tell you the order of engagement at a glance. The left-most units will get attacked first, and the right-most ones last.
Watch out for enemies with the flanking ability though! They will ignore this rule, and will attack your units with the fewest hit points instead.
Targeting order of your standard units
1. Recruit
2. Militia
3. Soldier
4. Elite Soldier
5. Cavalry
6. Bowman
7. Longbowman
8. Crossbowman
9. Cannoneer
Targeting order of your elite units
1. Swordsman
2. Mounted swordsman
3. Knight
4. Marksman
5. Armored marksman
6. Mounted marksman
7. Besieger
Detailed combat breakdown:
This is a detailed break-down of the combat mechanics for players who want to know exactly what goes on behind the scenes.
One combat round is a sequence of three initiative steps First strike, normal, and last strike (1). During each of those steps, all units with the respective initiative values attack once. Even if such a unit gets defeated during this step, it will be granted this final attack.
By default, a unit selects its target from all undefeated enemies by a priority system, which is displayed when moving your cursor over the garrison or enemy camp. The left-most units will get attacked first (2). Units with the flanking ability always target the enemy unit with the fewest hit points instead. Generals never get flanked.

After choosing its target, the unit will deal damage to it. Almost every unit has two attack damage values, one of which is chosen randomly for each attack. The unit’s accuracy attribute reflects the probability of it dealing the higher of the two damage values.
Damage dealt is subtracted from the target’s hit points. If your target’s hit points drop to 0, the target will be defeated. Excess damage is usually wasted (3). However, if the attacker has the splash damage ability, any excess damage is dealt to another opponent (selected in the same way as the original target). It is possible for one attacker to defeat multiple enemies this way (4).
After all eligible units have attacked, the same process is repeated for the next initiative step and, eventually, the next combat round. Defeated units are of course unable to attack in future steps.
Combat ends when all units on one side have been defeated. If you’ve won, your remaining units will destroy the camp. Check the entry on «Bandit Camp Demolition» to learn more.
Bandit Camp Demolition:
After one of your armies has defeated all the enemies in a bandit camp, your remaining units will start destroying the camp itself. (1)
Each unique unit type (e.g. Recruit, Militia or Cavalry) that remains in your army will deal its maximum attack damage to the camp every combat round.
Cannoneers and Besiegers also have the Demolition ability, which lets them deal double damage against camps! (2)Just like when fighting enemy units, the length of these combat rounds depends on your general’s combat time attribute. (3)
Camps have hit points just like units, and their destruction is complete once they run out of points. Afterwards, your general will either return to the garrison, or continue to the next camp.